
Can You Put a Wet Room on a Timber Floor?
Installer backed steps to build a watertight wet room on a timber floor. Choose 23 mm low profile formers or a plywood overlay with full tanking and...
Can You Put a Wet Room on a Timber Floor?
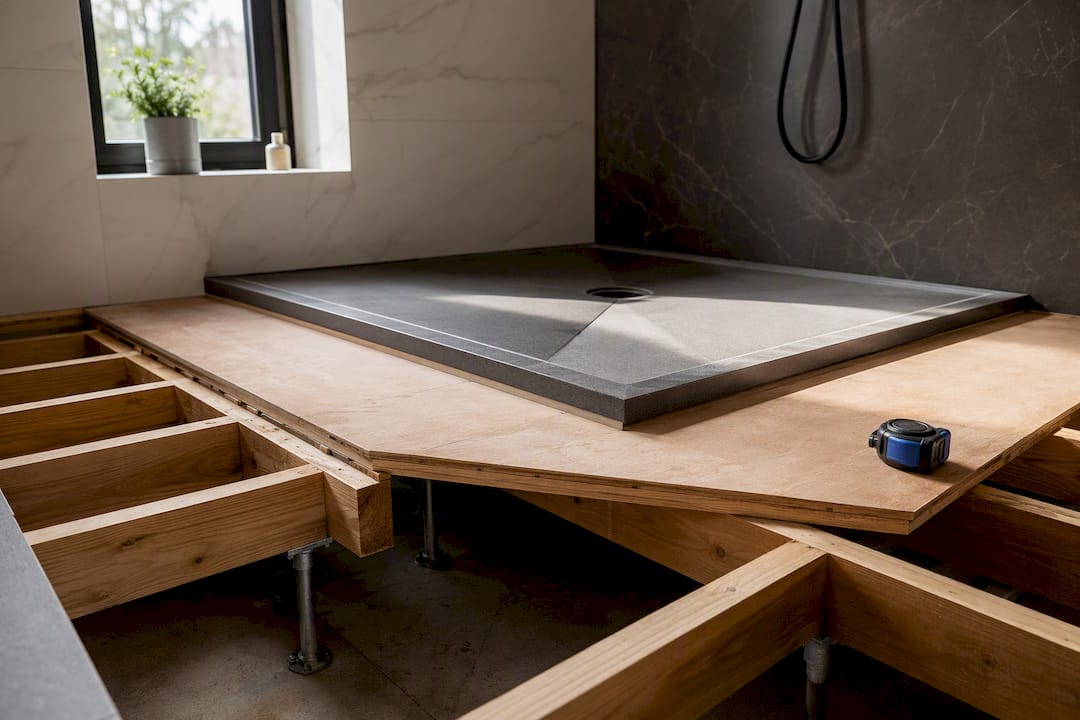
Yes, you can install a wet room on a timber floor, but only if the subfloor is structurally sound, you use a timber-specific former or plywood build-up, and you tank the entire area with a compatible decoupling system underneath the tiles. Skip any one of those three, and you’re building a leak into your ceiling on a timer. The two routes that actually work are a low-profile composite shower element or a reinforced plywood overlay with full tanking. Everything else is a shortcut you’ll pay for later.
TL;DR:
- Structurally sound timber subfloor, full tanking, and a decoupling membrane are essential; neglecting any increases the risk of ceiling leaks.
- Low-profile composite shower elements or reinforced plywood overlays with tanking are the only proven workable methods for wet rooms on timber floors.
- Proper joist inspection, moisture testing, and reinforcement are critical steps that determine whether a timber floor can support a wet room long-term.
- Drainage routes must be finalized before tiling, with linear drains suited for large tiles and single-direction fall, avoiding notching joists.
- Regular inspections and maintenance, including checking grout, silicone, and ceiling areas, are necessary to keep the installation watertight for years.
Table of Contents
- Wet Room on Timber Floor: Which Build Method Actually Works?
- The Structural Checklist Before You Touch a Tile
- How Do You Route Drainage on a Timber Floor?
- What Waterproofing System Does a Timber Wet Room Need?
- Which Tiles and Adhesives Work on a Tanked Timber Floor?
- Installing a Wet Room Upstairs: What Changes?
- What Do Installers Actually Check on Site?
- Long-Term Care: Keeping a Timber Wet Room Watertight for Years
- Sealing Pipe Penetrations and Joints Without Leaving Weak Points
- Do Standard Floor Finishes and Sealants Hold Up on Timber?
- What the Conventional Advice Gets Wrong
- Get a Timber-Floor Wet Room Done Right the First Time
- Sources
- FAQ
Wet Room on Timber Floor: Which Build Method Actually Works?
Most failures trace back to the decision of what substrate goes between the joists and the tiles. Using the wrong material here often leads to problems later that can’t be fixed by grout or sealant.
Low-profile composite shower elements are the fastest route to a flush finish on a suspended timber floor. Products like the Fundo Ligno Plus shower element sit at just 23 mm at the edge, with the slope and waterproofing already built into the panel. That low build height matters enormously when you’re working with a suspended floor and a fixed ceiling height below.
A shower base with underboarding suits jobs where the joist layout or an existing waste pipe forces a specific trap position. You build a supported platform, drop in a modular base, and route drainage around what the structure allows rather than what a former assumes.
Tiled wet rooms on timber using a lightweight former plus a decoupling membrane give you the most design freedom, especially with large-format porcelain. This is the labor-intensive option, but it lets you carry one continuous tiled surface from floor to wall with no visible step or lip.
What doesn’t work: concrete or screed-based wet room kits designed for solid floors. Timber flexes under load in ways concrete never does, and a rigid screed poured over a moving joist structure will crack within a year or two. Timber-floor wet room kits exist precisely because standard screeded systems assume a mass and rigidity that a wood floor doesn’t have.
- Low-profile formers offer advantages in installation speed and build height, suitable for tight ceiling clearance
- Underboarded shower base: best when trap position is fixed by existing plumbing
- Tiled former with decoupling membrane: most design flexibility, longest install time
- Concrete/screed kits: avoid entirely on suspended timber
The Structural Checklist Before You Touch a Tile
Nothing you do above the joists matters if the timber underneath is compromised. Professionals check the whole subfloor for damp, rot, or weakness before anything else, because no waterproofing membrane rescues a wet room built over failing timber. This is the step most DIY guides skip, and it’s the one that determines whether the project lasts five years or twenty.
Here’s the sequence installers actually follow:
- Test moisture levels with a moisture meter across the whole floor area, not just where the shower will sit. Readings above the timber’s normal range point to a leak or condensation problem that needs solving first, not covering up.
- Check for rot and insect damage by probing joists and boards at their ends and near any existing pipework. Soft, spongy timber gets replaced, not patched.
- Verify joist span and sizing against the load the new floor will carry, including a filled shower base and standing water weight.
- Strengthen joists where needed using noggins between joists or sistering a new joist alongside a weak one. Spacing typically targets close centers suitable for the specific former or tray manufacturer, though you should always follow their guidance for the exact figure.
- Fix moisture-resistant plywood, usually 18 to 25 mm thick, screwed at maximum 300 mm centers across the joists. This overlay is what your tanking membrane bonds to.
- Build underboarding and batten platforms wherever a trap or former needs a flat, supported base that sits flush with the finished floor level.
- Plan your finished height early, using packers or tapered transition strips where the wet room meets an adjoining room at a different level.
Manufacturer installation guides for timber-floor shower bases describe underboarding, batten trap platforms, and cutting floorboards to expose joists as standard steps, not optional extras. If you’re unsure whether your existing subfloor needs replacing outright, it’s worth reading through the process for how to replace a bathroom subfloor before committing to a wet room layout.
Pro Tip: Do a dry run with the former or tray in place, unfixed, before you commit to any cutting. It’s the cheapest insurance you’ll buy on this job, and it catches height and trap-alignment problems while they’re still easy to fix.
How Do You Route Drainage on a Timber Floor?
The drain decision shapes almost every other choice in the room, so make it before you finalize the layout.
Linear drains work best when you can commit to a single-direction fall and want to run large tiles without multiple slopes meeting at a point. Stainless steel channels hold their shape better than plastic under repeated foot traffic, which matters more on a floor with some natural flex. Point drains suit smaller wet rooms or spaces where a former’s outlet position already matches your existing pipe run.
The rule that trumps both: never cut into a main joist to chase a drain line. When routing drainage between joists isn’t possible without weakening the structure, installers pick a former with a rotating outlet or build a dedicated trap platform in the joist void instead.
- Choose linear drains for single-fall layouts and large-format tile
- Choose point drains where existing pipework already sits centrally
- Use offset traps or rotating outlets rather than notching structural joists
- Build in trap access now, because lifting tile later to service a hidden trap is a bigger job than most homeowners expect
Fall gradients vary by manufacturer, so always follow the product’s own installation specs rather than a generic rule of thumb. What stays consistent across every system is the need for an even, uninterrupted slope. A former that dips in the middle or has a low spot at the edge will pool water no matter how good the tanking is underneath.
Roughly a third of wet room callouts installers see trace back to drainage problems rather than tanking failures, which is why access to the trap matters as much as the fall itself. If you want the deeper mechanics of flow rates and trap types, the wet room drainage guide covers it in more detail.

What Waterproofing System Does a Timber Wet Room Need?
Tanking isn’t optional on any wet area, and BS 5385-1 sets out the standard for using an impermeable liquid-applied waterproofing membrane behind tiles in exactly this kind of space. NHBC tanking guidance and most former manufacturers point to the same requirement: the membrane has to be compatible with a timber substrate, not just any bathroom.
Liquid-applied membranes go on with a brush or roller and cure into a seamless waterproof layer. They’re forgiving around irregular shapes and awkward corners, which makes them a natural fit for the plywood overlay used on timber. Sheet membranes offer more consistent thickness but need careful detailing at joints and can be harder to seal fully around pipe penetrations on an uneven timber base.
A decoupling membrane sits between the plywood and the tile adhesive bed. It absorbs the small amount of movement that timber floors always have, which matters most with large-format tiles that crack easily under stress a smaller tile would simply flex through. Treat decoupling as essential, not optional, on any timber floor carrying tiles over 300 mm.
Detailing the penetrations is where most leaks actually start:
- Seal every pipe penetration with a purpose-made sleeve and waterproof tape collar
- Use pre-formed corner and upstand pieces at every internal and external angle
- Overlap membrane joints per the manufacturer’s minimum specification, never less
- Run a flood test, filling the tray or former area with water for 24 hours, before a single tile goes down
Pro Tip: Photograph every penetration and corner detail before you tile over it. If a leak shows up two years later, that photo record is the difference between a five-minute diagnosis and pulling up half the floor.
Which Tiles and Adhesives Work on a Tanked Timber Floor?
Porcelain tile is the standard choice for timber-floor wet rooms, largely because its low water absorption pairs well with the tanking underneath rather than fighting it. Slip rating matters more here than in a standard bathroom, since wet room floors have no upstand or step to catch overflow. Larger tiles look cleaner and need fewer grout lines, but they demand a flatter substrate and a properly specified decoupling membrane to avoid cracking.
Use polymer-modified adhesives rated for wet areas rather than a standard sand-and-cement mix, which won’t bond reliably to a decoupling membrane. Epoxy grout resists staining and holds up better under constant water exposure than standard cementitious grout, though it costs more and takes more skill to apply cleanly.
- Porcelain over ceramic for lower absorption and better wear resistance
- Polymer-modified adhesive matched to the specific membrane manufacturer’s compatibility list
- Epoxy grout in high-traffic wet areas, standard grout acceptable elsewhere in the room
- Confirm underfloor heating compatibility before installation, since not every membrane and adhesive combination is rated for it
Thresholds and transitions deserve real attention if accessibility matters, particularly a flush changeover to an adjoining hallway or bedroom. A well-detailed door threshold finishes the look; a poorly finished one is where trip hazards and leaks both start. For guidance on getting that transition right, see this rundown on choosing the right bathroom door.
Installing a Wet Room Upstairs: What Changes?
Upstairs wet rooms carry the same build principles with higher stakes, because a failure here damages the room below, not just the bathroom itself.
Check load-bearing capacity before assuming the existing joists can take a filled shower tray plus standing water weight on top of normal bathroom fixtures. If there’s any doubt, bring in a structural engineer rather than guessing. Never cut a main joist to route drainage on an upper floor. Use rotating outlets, offset traps, or a small ply access platform between joists instead.
Ventilation matters more upstairs than downstairs, since warm, humid air rises and tends to concentrate in upper-floor bathrooms. Mechanical extract ventilation with humidity control cuts condensation risk on the timber structure itself, not just on visible surfaces. Ventilation and humidity control is a recurring recommendation across timber wet room guides for exactly this reason.
- Confirm joist capacity with an engineer for anything beyond a simple tray replacement
- Route drains around joists, never through them
- Install mechanical extraction rated for the room’s size and usage
- Keep an access point near the trap in case of future leaks, so repairs don’t mean pulling up the ceiling below
If you’re worried about existing damage, our guide on diagnosing and fixing wet room leaks walks through the early warning signs before they become a ceiling problem.
What Do Installers Actually Check on Site?
A proper site survey goes further than eyeballing the floor. Moisture readings across the whole subfloor, a joist-by-joist check for rot or undersizing, and a trap alignment test against the existing waste pipe all happen before a single board comes up. A mock-up of the finished floor height against door thresholds and the shower former catches problems on paper instead of mid-install.
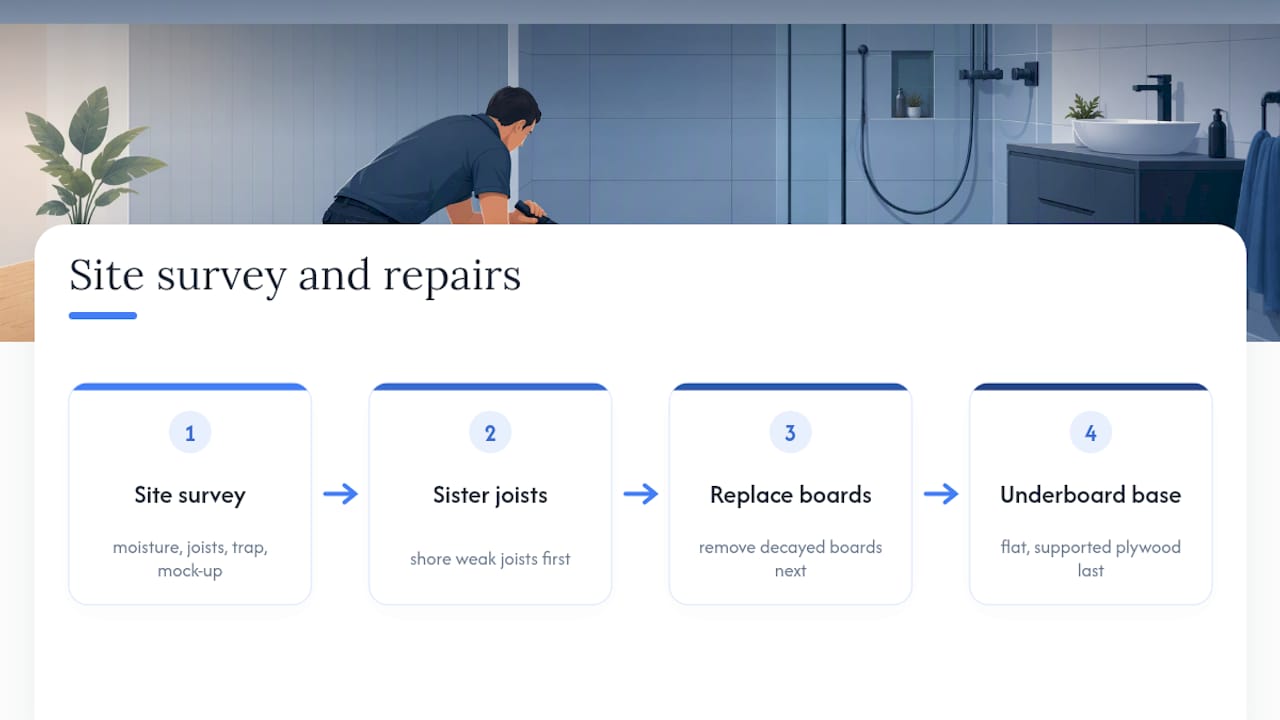
Typical remedial work follows a predictable order: sister any weak joists first, replace decayed boards next, then underboard to create a flat, supported base. Skipping straight to underboarding over a rotten joist just buries the problem under new plywood.
Before hiring anyone, ask what tanking system they use, whether it’s compatible with timber substrates specifically, and whether they’ll run a flood test before tiling. Ask for evidence of past timber-floor wet rooms, not just tiled bathrooms generally. The two jobs use different products and different sequencing, and a contractor who’s only worked on solid floors will often default to the wrong build-up out of habit.
Long-Term Care: Keeping a Timber Wet Room Watertight for Years
A tanked timber wet room isn’t a fit-and-forget job. Annual checks catch small problems before they become structural ones, and the checks take less than half an hour.
Inspect grout lines and silicone joints yearly for cracking or gaps, since these are the first places a membrane failure shows up on the surface. A hairline crack in grout usually means movement underneath, not just cosmetic wear, and it’s worth investigating rather than simply regrouting over it.
Check the ceiling directly below the wet room every few months if the room sits upstairs. Staining, a musty smell, or soft plaster are early signs of a slow leak that hasn’t reached the surface tiles yet. Catching it here, before it shows up in the wet room itself, saves a full re-tile.
Keep extraction running during and for a while after every shower, not just while the room is in use. Humidity lingers in enclosed bathrooms far longer than most homeowners assume, and that lingering moisture is what timber structures react to over years, not the brief exposure during a shower itself.
Watch for any change in floor feel underfoot, a slight give or bounce that wasn’t there before. That’s often the first physical sign of joist movement or plywood delaminating from moisture ingress, well before any visible tile damage appears. Address it immediately rather than waiting for a crack to confirm the suspicion.
Keep a simple record of when the wet room was tanked, which products were used, and any repairs carried out. If a problem does show up five years from now, that record tells a plumber exactly what they’re dealing with instead of guessing.
Sealing Pipe Penetrations and Joints Without Leaving Weak Points
Every pipe that passes through a timber wet room floor is a potential leak point, and most failures in tanked floors start at these junctions rather than across the flat tiled area.
Use a purpose-made pipe collar or sleeve rated for the specific membrane system you’re installing, rather than relying on sealant alone to bridge the gap. Sealant flexes and shrinks over time; a proper mechanical collar doesn’t rely on that flexibility holding forever.
Tape every joint where plywood sheets meet, and where the floor membrane turns up a wall or around a former’s edge, using the tape specified by that membrane’s manufacturer. Mixing tape and membrane brands is a common shortcut that voids compatibility and, often, any warranty that came with the product.
Corner details need pre-formed pieces rather than folded sheet membrane or built-up liquid coats. A folded corner is a stress point that cracks under the small amount of movement timber floors always have, even after tanking.
Before any tile goes down, run water directly over every penetration and joint, not just a general flood test of the tray area. Watch the ceiling below for at least 24 hours. This step catches the specific weak points a general flood test can miss, because water finds the lowest-resistance path, and that’s usually a poorly sealed pipe collar, not the open floor.
Do Standard Floor Finishes and Sealants Hold Up on Timber?
Not every finish or sealant sold for bathrooms is rated for a timber substrate underneath, and that distinction matters more than most product labels make clear.
Standard silicone sealant works fine at the tile and fixture level, but it’s not a substitute for a proper membrane at the substrate level. Homeowners sometimes assume a thick bead of silicone around a shower base does the job a tanking membrane is supposed to do. It doesn’t, because silicone seals a visible gap; it doesn’t stop moisture migrating through plywood joints or into the timber structure itself.
Check that any adhesive, primer, or membrane you use is explicitly listed as compatible with plywood or timber substrates, not just “suitable for wet areas” in general marketing language. Some tanking products are formulated for masonry or screed and perform poorly, or not at all, over timber’s natural flex.
Vinyl and LVT flooring can work in a wet room in limited applications, typically outside the direct splash zone, but they’re not a substitute for tiled tanking within the shower area itself. If you’re weighing finish options across the wider bathroom, our piece on wet room design ideas covers where LVT fits and where it doesn’t.
What the Conventional Advice Gets Wrong
Most guides treat “waterproofing” as a single step, one membrane, one product, job done. That framing undersells how much of the real risk lives in the structural decisions made before the membrane ever goes down. A perfectly tanked floor over a rotten joist still fails. I’d argue the industry’s obsession with membrane brands and tanking kits has quietly overshadowed the boring, unglamorous work of joist inspection and subfloor prep, which is where most real failures start.
The other overrated piece of advice: chasing the lowest-profile former as the main goal. Height matters, but it’s a design constraint, not a safety one. A slightly taller build with rock-solid joists and a properly detailed decoupling layer beats a razor-thin former sitting on a floor nobody actually checked.
If you take one thing from this guide, prioritize the subfloor inspection over the product choice. Everything else, formers, drains, tile size, is a downstream decision that only works if the structure underneath is sound.
— James
Get a Timber-Floor Wet Room Done Right the First Time
A reliable specialist handles the part most guides gloss over: the structural inspection and joist work that decides whether a timber-floor wet room lasts five years or twenty. Rather than quoting a standard bathroom job and hoping the subfloor cooperates, the team surveys the joists, checks for damp and rot, and specs the tanking system to the timber substrate before any tile goes down.

We install low-profile shower elements and full tiled wet room build-ups across Cardiff and the Vale of Glamorgan, including upstairs conversions where load and drainage routing need extra care. If you’re planning a renovation and want a survey that actually checks the structure first, get in touch through our bathroom installation Cardiff page, or if you’re in the Penarth area, start with our Penarth bathroom installation service directly.
Sources
- Fundo Ligno Plus shower element (wedi)
- The Guide to Wet Room Kits for Timber or Wooden Floors
- Shower Base + Linear Drain Installation on Wooden Floor | Wetroomstop
- Tiling onto wood guidance (Weber UK)
FAQ
Can You Have a Wet Room on a Wooden Floor?
Yes, provided the subfloor is structurally sound and you use a timber-specific former or plywood overlay with full tanking and a decoupling membrane underneath the tiles.
Can You Lay a Shower Tray Directly on Floorboards or Plywood?
No, you shouldn’t tile or set a tray directly on bare floorboards. Fit moisture-resistant plywood, typically 18 to 25 mm thick, screwed at close centers, or use a purpose-built underboarding platform first.
What Type of Floor Is Best for a Wet Room?
A solid concrete floor with a traditional screed works well, but on a suspended timber floor, a low-profile composite former or a plywood overlay with full tanking is the practical equivalent.
What Are the Best Wet Room Shower Trays for Timber Floors?
Low-profile composite elements designed specifically for timber, such as the Fundo Ligno Plus, work well because of their low edge height and integrated waterproof core, though a manufacturer-approved underboarded shower base is a solid option when trap position dictates the layout.
Do I Need Planning Permission or Building Control Approval?
Most wet room installations fall under building regulations rather than planning permission, particularly for waterproofing and electrical work, so check with your local authority or a qualified installer before starting.