
Shower Wall Waterproofing: A Practical Guide for Homeowners
Ensure your tiles last with our guide on shower wall waterproofing. Discover the best methods to protect your home from moisture damage.
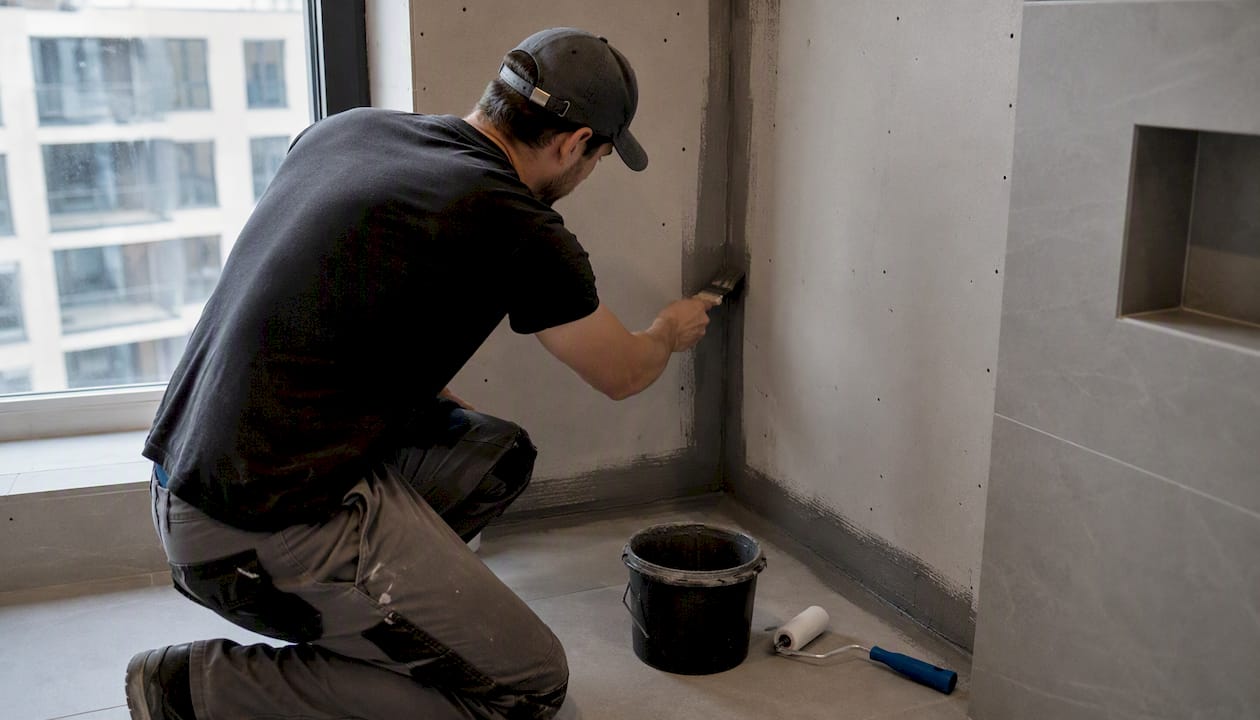
Yes, you must waterproof shower walls before tiling. Tiles and grout are water-resistant, not waterproof, and without a continuous membrane behind them, moisture migrates through grout lines into the substrate within months. For most DIY jobs on new cement backer board, a liquid-applied tanking membrane is the right starting point. It’s fast, reliable, and straightforward for a single installer to apply correctly. Sheet membranes suit wet rooms or uneven surfaces; foam board systems work best when you want a fully waterproof substrate from the start.
Use a liquid membrane if you’re tiling a standard shower enclosure on flat cement board. Switch to a sheet membrane or foam board system if you’re building a full wet room, dealing with an uneven substrate, or need to tile the same day. Whatever system you choose, BS 5385-1:2018 requires substrates in wet areas to be waterproofed with a proprietary tanking system before any tiles go on. Always pull the product’s Technical Data Sheet (TDS) before you buy.
Key Takeaways
Correct shower wall waterproofing requires a proprietary tanking membrane applied in two coats over a suitable substrate, with reinforcing tape at every corner and penetration, before any tile adhesive goes on.
| Point | Details |
|---|---|
| Tanking is mandatory | BS 5385-1:2018 requires a proprietary waterproofing system in all wet areas before tiling. |
| Details fail first | Corners, pipe penetrations, and the tray junction are where leaks start; tape every one. |
| Follow the TDS | Cure-to-tile time, WFT target, and primer requirements vary by product and determine warranty validity. |
| Test before tiling | A 24-hour flood test at the tray junction confirms the installation is watertight before tiles go on. |
| Jmplumbingservicesltd | Covers Cardiff and the Vale of Glamorgan for full tanking, tiling, and wet-room installs with documented warranties. |
Table of Contents
- Why do shower walls need waterproofing?
- What UK standards apply to shower waterproofing?
- Which waterproofing method is right for your shower?
- How to tank shower walls: step-by-step
- Common DIY mistakes and how to fix them
- When should you call a professional instead?
- How Jmplumbingservicesltd tanked and tiled a Cardiff shower
- What a bathroom fitter actually sees on site
- Jmplumbingservicesltd: professional tanking and tiling across Cardiff
- Useful sources and product datasheets
Why do shower walls need waterproofing?
Grout is porous. Even well-pointed, well-sealed grout joints allow small amounts of moisture through over time, and that moisture has nowhere to go except into the wall behind. On a plasterboard substrate, the result is predictable: the board swells, softens, and eventually fails. On timber-framed walls, the joists rot. On any substrate, trapped moisture feeds mold colonies that spread behind tiles long before you see them on the surface.
The most common leakage entry points are not the flat wall areas. They’re the details:
- Internal corners where two tiled walls meet
- The wall-to-tray junction at floor level
- Pipe penetrations and valve holes
- The perimeter of recessed niches
- Drain surrounds in wet rooms
Skipping waterproofing to save a few hours and the cost of a kit is a false economy. Strip-out and remediation after a failed shower, including new backer board, fresh adhesive, new tiles, and any structural timber repairs, costs significantly more than the membrane system that would have prevented it. Getting the waterproofing right the first time protects the structure, keeps the finish looking good for years, and satisfies the requirements that underpin any installer warranty.
What UK standards apply to shower waterproofing?
BS 5385-1:2018 is the governing British Standard for wall and floor tiling in internal areas, and Clause 6.1.1.3 makes tanking a requirement for all wet areas, including domestic showers. This is not a guideline you can opt out of if you want the installation to meet accepted trade practice. NHBC guidance for new builds adds a further layer, referencing EAD-certified systems for certain construction types.
In practical terms, the standard means:
- Tanking must cover the full shower enclosure, typically to at least 1800mm above finished floor level on walls directly receiving water
- The membrane must return onto adjacent walls and the shower tray upstand, with a minimum overlap
- All joints, corners, and penetrations must be reinforced with tape or preformed details
Ardex’s published commentary on regulatory updates explains why proprietary tanking systems are now standard expected practice rather than a premium option. The shift matters for homeowners because it affects warranty validity: if a contractor or DIYer skips tanking and a leak develops, the tile adhesive manufacturer’s warranty is void.
Pro Tip: Before you buy any membrane, download the product TDS from the manufacturer’s website. Check the wet-film thickness (WFT) target, the number of coats required, the cure-to-tile time, and whether the product carries UKCA or CE marking. These specs determine whether your installation meets the warranty conditions.
Which waterproofing method is right for your shower?
Three main systems cover the vast majority of UK domestic showers. Each suits different substrates, skill levels, and project timelines.
| Method | Best for | Typical kit contents | Coverage per kit varies by manufacturer and product | Cure to tile | DIY ease | Warranty notes |
|---|---|---|---|---|---|---|
| Liquid-applied membrane | Cement board, new plasterboard, standard shower enclosures | Primer, membrane, reinforcing tape, corner pieces, pipe seals | Varies by brand; check TDS | Typically a day or two after the final coat | High: brush or roller, no specialist tools | Valid when TDS specs followed |
| Sheet membrane (fleece-bonded) | Wet rooms, uneven substrates, high-traffic commercial | Membrane rolls, seam tape, unmodified thinset | Sold by the metre | Can tile same day after thinset cure | Moderate: seam lapping and banding required | Requires unmodified thinset; check brand spec |
| Foam board / waterproof backer | Full-system installs, new builds, wet rooms | Boards, jointing tape, compatible adhesive | Sold per board | Tile immediately after board fixing | Moderate: cutting and screwing required | System warranty when used with compatible adhesive |
For most homeowners tiling a standard shower cubicle, liquid-applied membranes balance speed, cost, and reliability better than the alternatives. Sheet membranes are the trade preference for wet rooms or when the substrate is uneven, because the fleece layer bonds mechanically to the thinset rather than relying on adhesion to a potentially dusty or variable surface. Foam boards eliminate the membrane step entirely by making the substrate itself waterproof, but they require careful jointing and a compatible tile adhesive system.
Common misapplications to avoid:
- Applying liquid membrane directly to standard drywall without a primer or without checking the manufacturer’s substrate compatibility list
- Skipping the reinforcing tape at corners and assuming the membrane coat alone is sufficient
- Using a modified thinset over a sheet membrane when the manufacturer specifies unmodified
How to tank shower walls: step-by-step
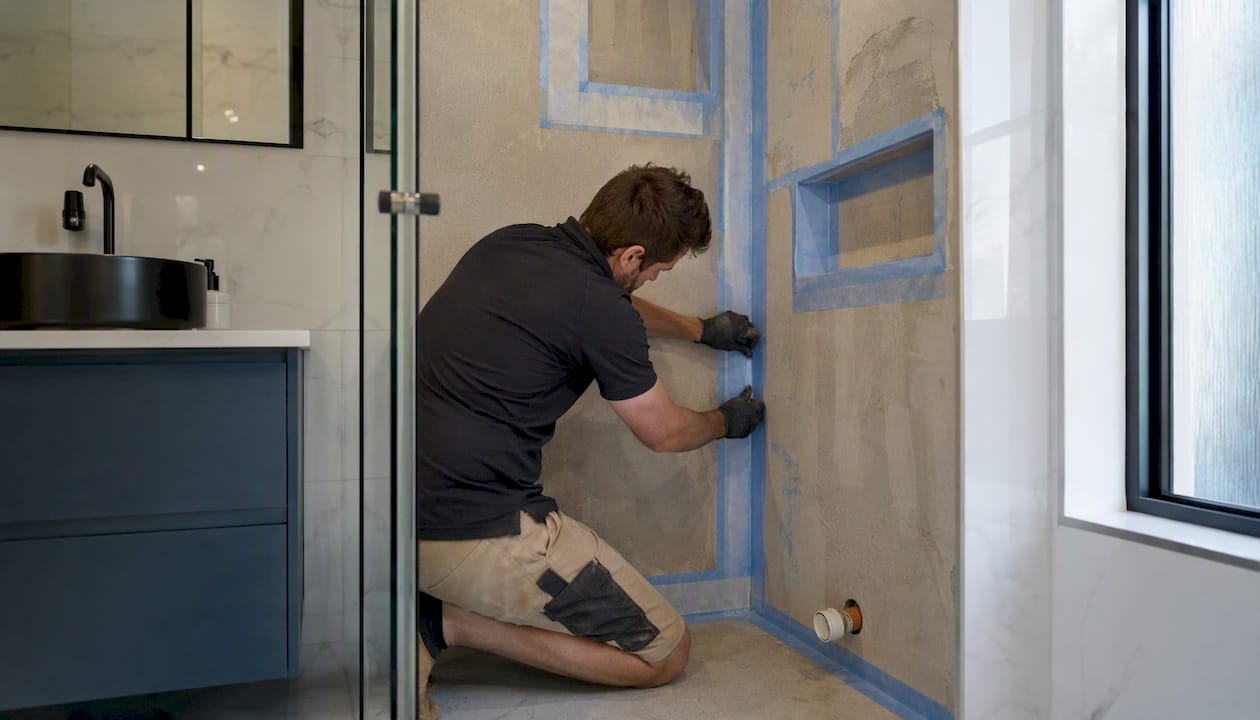
This sequence follows the detail-first approach recommended by trade guides and aligns with BS 5385 tanking requirements.
Tools and safety equipment: brush or short-pile roller, WFT gauge, scissors or knife for tape, screwdriver, mixing paddle if using a two-part system, gloves, eye protection, and adequate ventilation throughout.
-
Inspect and prepare the substrate. Cement backer board is the preferred substrate for tanked showers. If you’re using plasterboard, confirm the membrane manufacturer lists it as a compatible substrate. Fix any loose screws, fill gaps at board joints with a compatible filler, and check the surface is flat. Recommended screw spacing for cement board is typically 200mm at edges and 300mm in the field, but follow the board manufacturer’s spec.
-
Apply primer. Brush or roll the primer evenly across the entire area to be tanked. Allow it to dry to the manufacturer’s stated time before proceeding. Skipping primer on plasterboard is one of the most common causes of membrane delamination.
-
Apply the first membrane coat and bed the tape. Brush or roll the first coat of membrane onto the wall. While it is still wet, press reinforcing tape into all internal corners, the wall-to-tray junction, and around every pipe penetration and valve hole. Smooth the tape firmly so it is fully embedded with no air pockets. Apply a thin additional coat of membrane over the tape to fully encapsulate it.
-
Allow the first coat to reach touch-dry. Check the TDS for the minimum inter-coat time. Rushing the second coat onto a wet first coat traps moisture and compromises the film build.
-
Apply the second coat at right angles to the first. Working perpendicular to the first coat direction gives more even coverage and helps identify any thin spots. Use a WFT gauge to check you’re hitting the manufacturer’s target. A WFT gauge costs a few pounds and prevents the most common cause of membrane failure.
-
Seal penetrations and niches. Fit preformed pipe seals around any pipe exits. For recessed niches, slope the shelf slightly toward the shower to shed water, and apply membrane to all niche surfaces including the back wall and shelf. Sequence these details before the final coat so they’re encapsulated.
-
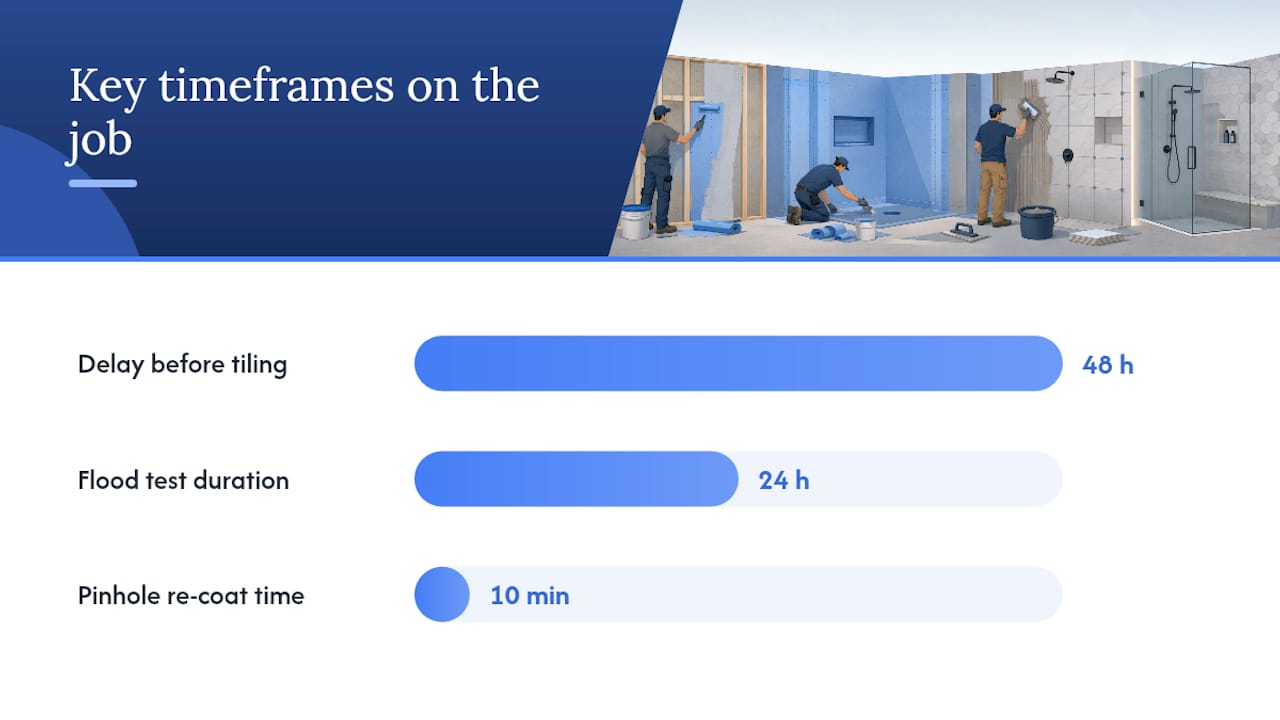
Inspect and flood-test. Hold a torch at a low angle across the membrane surface to spot thin areas or pinholes. Re-coat any suspect areas and allow to cure. For the tray-to-wall junction, a 24-hour flood test confirms the pan and wall junction is watertight before tiles go on.
-
Observe the full cure-to-tile time. Check the TDS. Most liquid systems specify 24–48 hours after the final coat before tile adhesive can be applied. Tiling too soon is one of the most frequent DIY errors and can cause adhesive failure.
Pro Tip: Keep the product packaging and TDS after the job. If a warranty claim ever arises, you’ll need to show which product was used, the batch number, and that the installation followed the manufacturer’s instructions.
Common DIY mistakes and how to fix them
Most shower waterproofing failures trace back to a handful of repeatable errors. Knowing them in advance is cheaper than discovering them after the tiles are on.
The most common mistakes:
- Using standard drywall without confirming membrane compatibility, or without a primer coat
- Applying membrane too thinly by not checking WFT during application
- Missing the reinforcing tape at corners and assuming a thick coat compensates
- Tiling before the membrane has reached full cure
- Using a modified tile adhesive over a sheet membrane that requires unmodified thinset
- Filling the wall-to-tray joint with grout instead of sanitary silicone, which cracks as the tray flexes
How to detect problems before tiling:
- Run a torch at a shallow angle across the cured membrane. Thin spots appear as lighter patches or slight sheen differences.
- Press lightly across the surface. Any areas that feel soft or that flex suggest poor adhesion or an uncured section.
- Check corners by running a fingernail along the tape edge. If the tape lifts, it wasn’t fully embedded.
- Perform a small flood test at the tray junction before tiling.
Quick fixes:
- Thin areas: clean the surface, allow to dry, and apply an additional coat to the manufacturer’s WFT spec.
- Lifted tape: cut back the affected section, re-prime if needed, re-bed fresh tape into a new coat, and allow to cure before proceeding.
- Compromised backer board: if the board is soft, swollen, or delaminating, replace it. Tanking over a failed substrate does not fix the substrate.
If you’re already seeing signs of a shower leak through the ceiling, the waterproofing has already failed and remediation rather than repair is the right call.
When should you call a professional instead?
DIY tanking is achievable for a competent homeowner on a straightforward shower enclosure. But some situations genuinely call for a professional, and recognizing them early saves money.
Call a pro when:
- You’re building a full wet room with a screeded floor and linear drain
- There is existing structural rot in joists or studwork behind the walls
- The project involves multi-trade coordination: plumbing, screed, waterproofing, and tiling in sequence
- You’re working with complex geometry: curved walls, multiple niches, or a bespoke shower tray
- You don’t have the time or confidence to follow the TDS precisely
Questions to ask any tradesperson before hiring:
- What membrane system do you use, and can you show me the TDS?
- Do you carry public liability insurance, and can I see the certificate?
- Will you flood-test the installation before tiling?
- Who applies the waterproofing: you, or a subcontractor?
- What guarantee do you offer, and is it backed by the membrane manufacturer’s warranty?
- Can you provide references from similar local jobs?
For a standard shower tank-and-tile job in the UK, expect a professional to take a couple of days for the waterproofing and tiling combined, with the tanking day followed by a cure period before tiles go on. A full wet room with screed generally takes several days. Costs vary by location and specification; always get an itemized written quote that references the membrane system by name.
Pro Tip: Ask the contractor to register the membrane warranty with the manufacturer on completion and to hand over the TDS and product batch records. This documentation protects you if a defect claim arises later.
For a leaking shower tray or any situation where water has already reached the structure, get a professional assessment before deciding whether to re-tile or strip out.
How Jmplumbingservicesltd tanked and tiled a Cardiff shower
A recent job in the Canton area of Cardiff illustrates what a correctly executed tanking installation looks like in practice. The existing shower enclosure had standard plasterboard walls with no membrane behind the original tiles. After strip-out, the lower 400mm of board on two walls showed visible moisture staining and soft spots, confirming the original installation had no tanking at all.
The scope: replace the damaged plasterboard sections with 12mm cement backer board, apply a two-coat liquid membrane system with reinforcing tape at all corners and the tray junction, flood-test for 24 hours, then tile with a large-format porcelain.
Key steps on the job:
- Cement board fixed at 200mm screw centres at edges, all joints taped with alkali-resistant mesh before priming
- Primer applied to the full enclosure and allowed to dry fully before membrane
- First membrane coat applied by brush to corners and details, then roller to flat areas; reinforcing tape bedded into wet coat at all internal corners, the tray upstand, and both pipe penetrations
- Second coat applied at right angles after the first coat reached touch-dry; WFT gauge used to confirm coverage
- Flood test held for 24 hours with no drop in water level at the tray junction
- Tiling began 48 hours after the final membrane coat, using a membrane-compatible flexible adhesive
The flood test is the step most DIYers skip because it feels unnecessary when the membrane looks fine. On this job, it caught a pinhole at one pipe penetration that wasn’t visible to the eye. Ten minutes of re-coating saved what would have been a leak behind the tiles within a year.
Jmplumbingservicesltd carries full public liability insurance and documents each installation with product batch records and TDS references, which are handed to the homeowner on completion. Local references from Cardiff and the Vale of Glamorgan are available on request. Contact Jmplumbingservicesltd for a site survey or to compare the DIY route against a professional quote.
What a bathroom fitter actually sees on site
The gap between reading a how-to guide and executing a watertight installation usually comes down to two things: patience and detail work. Most homeowners who attempt DIY tanking get the flat wall areas right. Where jobs fail is at the corners, the tray junction, and the pipe penetrations, precisely the spots that take the most time and feel fiddly.
The other consistent issue is timetable pressure. Homeowners book tilers for the day after they plan to finish the membrane, which means the membrane gets tiled over at 18 hours instead of 48. That’s not a minor shortcut. Tile adhesive applied over an under-cured membrane can pull the membrane away from the substrate as it cures, creating voids that trap moisture. The whole point of the membrane is then defeated.
The jobs that hold up over years are the ones where the installer treated the cure time as non-negotiable, used a WFT gauge rather than eyeballing coverage, and tested the tray junction before a single tile went on. Those three habits cost almost nothing extra and account for the difference between a shower that lasts a decade and one that needs stripping out in three years.
Jmplumbingservicesltd: professional tanking and tiling across Cardiff
If the DIY route feels like more risk than it’s worth, Jmplumbingservicesltd offers a straightforward alternative: a site survey, a written quote with an itemized tanking scope, and a completed installation backed by product warranties and public liability insurance.

The service covers waterproofing, tiling, wet-room installs, and full bathroom renovations in Cardiff and the Vale of Glamorgan. Every job uses named membrane systems with TDS references in the quote, and product batch records are handed over on completion so the manufacturer warranty is fully documented. No guessing about what went on the walls or whether the cure time was observed.
For homeowners in Penarth, Cowbridge, Barry, and the wider Vale of Glamorgan, Jmplumbingservicesltd offers the same service locally. Get in touch via the bathroom installation Cardiff page to book a site survey or request a quote. A site visit is the fastest way to get an accurate scope and a realistic timeline, whether you’re planning a standard shower enclosure or a full wet-room conversion.
Thinking about the wider renovation while you’re at it? Choosing moisture-resistant bathroom doors alongside a properly tanked shower is one of those details that makes the whole room last longer.
Useful sources and product datasheets
Read the product TDS before you buy, not after. The TDS tells you substrate compatibility, primer requirements, WFT targets, inter-coat times, and cure-to-tile times. These are the numbers that determine whether your installation meets the warranty conditions.
Key sources to download and keep:
- Bathroom Tanking and Waterproofing: BS 5385 Requirements
- How to Tile a Shower Wall (and Tank It Properly): UK Step-by-Step | TileFlow UK
- How to tank a shower area | Tiling
- How to Waterproof Shower Walls A Pro’s Guide for 2026
- Mapei Shower Waterproofing Kit
- The New Waterproofing Regulations & What They Mean To …
- How to Tile a Shower Wall: Waterproofing & Installation -
- SHOWER WATERPROOFING KIT
Keep physical or digital copies of the TDS and product packaging after installation. If you hire a contractor, ask them to include these documents in the handover pack alongside any warranty registration confirmation.